
Now that the temperatures are low, you have probably already put away the fans you had been using over the summer. Before you use your fans next summer, here is a fairly easy way to remove dust from the fan blade and fan blade cover.
Disassembly
NOTE
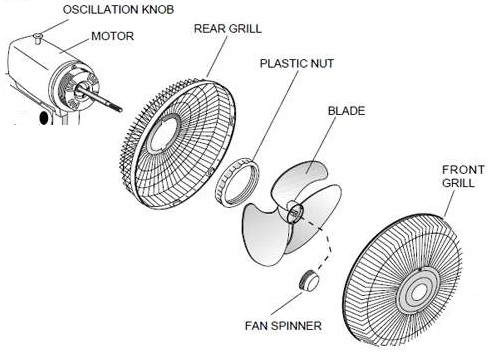
This procedure covers most household fans. Your fan could be assembled using different parts.
Designate a location for keeping all the parts in one place during disassembly.
WARNING
When removing the plug from a wall outlet ALWAYS pull on the plug, NEVER the cord. Pulling on the cord could cause it to separate from the plug, leaving potentially dangerous wires exposed in your hand.
Always disconnect electricity from any appliance before working on it. Failure to do so could cause injury or death.
- Disconnect electricity from the fan. In most cases, that means removing the plug from a wall outlet, though it could mean manually tripping a circuit breaker, or removing a house fuse.
- Separate the front grill from the rear grill. (Grills are held together by various means, including screws or clips).
NOTE
Most fan spinners are assembled with left-hand threads due to the direction that the blade spins during operation.
- Hold the blade to prevent it from turning while unscrewing the fan spinner.
- Slide the blade down the shaft away from the motor and remove the fan from the shaft.
- Unscrew and remove the plastic nut holding the rear grill to the motor assembly.
- Remove the rear grill from the motor assembly.
Cleaning
CAUTION
NEVER let water come in contact with any electrical part of the fan or motor. Doing so could ruin the fan.
- Before cleaning the disassembled parts, use a vacuum cleaner hose assembly and small brush (maybe an old toothbrush) to clean dust from all visible electrical parts.
NOTE
Cleaning may be performed in a kitchen sink (if the blade and screens are small enough to be immersed), or a bathtub (if these parts are too big for the sink).
- Draw enough water to cover the blade and screens, immersed one at a time.
- One at a time, immerse the blade and screens in the drawn water. Swish them to create water turbulent around the parts. In most cases, this will remove the dust. If not, use an old toothbrush to get into the gaps.
- As each part is cleaned, place it in a dish drainer, or on a clean, dry towel.
Reassembly
Caution
All parts must be thoroughly dry before reassembly begins. If any part is damp, it could cause a mold buildup.
- Reassemble the fan blade and grill cover in the reverse order of disassembly. Pay close attention to any locator pin keys (especially where the rear grill mounts onto the fan motor), and where the two grills are joined together. In most cases, the fan spinner has a left-hand thread.
NOTE
A barstool works perfect for covering the fan in a plastic bag. Just be sure not to get any oil/grease from the underside of a swivel barstool on the bag.
- Open and spread out the inside of a clear plastic bag on a flat surface. Place the fan in the center of the opened bag, being careful not to allow the fan to tip. Bring up the bag all around, try to push out excess air, and tie the bag closed. Cut off all excess plastic from where the bag is tied together. Find a good place to store the fan until next summer.